Installation & Setup
Step 1: Install the Flipbot App
The first thing you need to do is install Flipbot in your Uberflip account. You can do that from the Uberflip Marketplace, here:
Step 2: Create a Flipbot Form CTA
Next, you need to create a dedicated Form CTA for Flipbot in Uberflip. Flipbot uses this Form CTA to communicate with your Marketing Automation Platform (MAP) and pull prospect details.
- When you create the Form CTA, the fields you choose to include will determine the information that Flipbot provides when it messages a Sales Stream owner (e.g. name, email, company, etc.).
- We also recommend adding the field “ID” (supported in most MAPs) to the Form CTA and setting it as hidden, as this allows Flipbot to differentiate prospect messages by including an emoji face.
- You can design the Form CTA any way you like, as you do not need to place/display it anywhere. The only exception to this is if you configure Flipbot to gate Sales Streams: in this case, the CTA will be displayed to unknown (not yet profiled) prospects.
- If you want to enable the gating option but also want to include fields that should not be visible to prospects, make sure to set these fields to “hidden”.
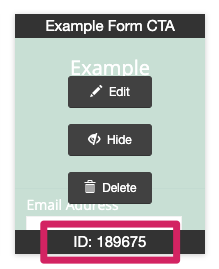
When you create your Flipbot Form CTA, make a note of its CTA ID. You can find it in Uberflip under Hubs > Calls-To-Action: hover your mouse over the CTA, and its ID will appear at the bottom of the CTA’s tile:
Step 3: Configure Flipbot
Now, you can configure Flipbot so that it works properly with your Slack workspace and MAP.
You can configure Flipbot at the account level and at the Hub level. Setting up Flipbot at the account level will apply to all Hubs under that account. If you separately configure Flipbot at the Hub level for any Hub, these settings will override any account-level settings.
Here’s where you can find Flipbot’s settings:
-
Account Level: Navigate to Account Settings > Integration > Connected Services > Apps tab, hover your mouse over Flipbot, then click on the Edit (pencil) button.
-
Hub Level: Navigate to Hubs > Integrations > Apps tab, hover your mouse over Flipbot, then click on the Edit (pencil) button.
For help with configuring Flipbot’s various settings, proceed to the Configuration section.
Step 4: Add Flipbot to Slack (Optional)
The last thing to do is to add Flipbot to your Slack workspace. This is optional: if you only want to use email notifications, you can skip this step.
To add Flipbot to Slack, click on the Add to Slack button:

Once added to your Slack workspace, Flipbot will be available to all users in that workspace.